
In this tutorial, you’ll learn how to use layer masks in Photoshop. What is a Layer Mask you might ask? Here is how Adobe describes Layer Masking:
 Next, insert a new layer above the rectangle layer. Choose the ellipse tool and change the fill color to something other than what you used for the rectangle. Now draw the ellipse on to the new layer large enough to completely cover the rectangle.
 After selecting the Add Layer Mask button, you will see a white layer mask thumbnail on the ellipse layer.
 Now that the Layer Mask has been inverted and set to all black, let’s see what we can do with it.
The layer mask should still be selected, but if it isn’t make sure it is. Then Choose the Brush Tool from the Tools Panel. Make sure to set the fill color to white so that we can reveal the layer underneath. I am going to use a solid round brush for this demonstration, but you can use which ever brush you desire. Set your brush anywhere over the rectangle and paint over the top of it just enough to expose the selected ellipse layer. Take note of the Layer Mask thumbnail on the ellipse layer. You will see that where ever you painted white will show here.
Now that the Layer Mask has been inverted and set to all black, let’s see what we can do with it.
The layer mask should still be selected, but if it isn’t make sure it is. Then Choose the Brush Tool from the Tools Panel. Make sure to set the fill color to white so that we can reveal the layer underneath. I am going to use a solid round brush for this demonstration, but you can use which ever brush you desire. Set your brush anywhere over the rectangle and paint over the top of it just enough to expose the selected ellipse layer. Take note of the Layer Mask thumbnail on the ellipse layer. You will see that where ever you painted white will show here.
 This showed you how to reveal/show parts the layer. The same thing can be done to conceal/hide parts of the layer. With the layer mask and brush still selected, change the brush fill color to black. Now paint over some of the white area of the mask. You will notice that you are concealing/hiding that part of the exposed layer. I kept the solid round brush and just reduced its size and painted a small spot on the layer. In the screenshot below, you will see that it concealed/hid the part of the layer that was showing.
 As far as the basics go, that’s it. That is how you add a Layer Mask and use it to show or hide parts of a layer. You can expand on this by experimenting with different techniques such as using different brushes, softening your brush and adjusting opacity and flow to blend the layer, cutting out objects, and more. In this tutorial, I only used the Brush Tool with the Layer Masks. It is not the only tool that can be used.
Layer Masks are an extremely valuable tool and something I use in almost every photoshop design. The best part of Layer Masks is that they are non-destructive. If you mess up or want to start over, either delete the mask and re-add it or take your brush and color over the entire mask and just start over. Get out there and practice, experiment, and become comfortable with Layer Masks.
Stay tuned for more advanced Layer Mask tutorials.
As far as the basics go, that’s it. That is how you add a Layer Mask and use it to show or hide parts of a layer. You can expand on this by experimenting with different techniques such as using different brushes, softening your brush and adjusting opacity and flow to blend the layer, cutting out objects, and more. In this tutorial, I only used the Brush Tool with the Layer Masks. It is not the only tool that can be used.
Layer Masks are an extremely valuable tool and something I use in almost every photoshop design. The best part of Layer Masks is that they are non-destructive. If you mess up or want to start over, either delete the mask and re-add it or take your brush and color over the entire mask and just start over. Get out there and practice, experiment, and become comfortable with Layer Masks.
Stay tuned for more advanced Layer Mask tutorials.
Layer masking is a reversible way to hide part of a layer. This gives you more editing flexibility than permanently erasing or deleting part of a layer.Let’s expand on that a bit. Layer Masking is a non-destructive way of showing or hiding parts of any layer. When they say reversible, it means that what you have done is not permanent and can be undone. As we walk through the basics of Layer Masks, remember this saying – “White Reveals, Black Conceals.”
Let’s Setup Our Document
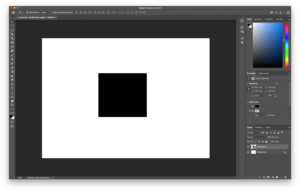
Open Photoshop and create a new document. The first thing we’ll do is choose the rectangle tool and draw it in the center of the workspace and set the color to black (or whichever color you prefer).
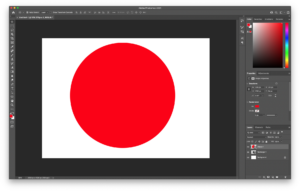
Next, insert a new layer above the rectangle layer. Choose the ellipse tool and change the fill color to something other than what you used for the rectangle. Now draw the ellipse on to the new layer large enough to completely cover the rectangle.
Adding a Layer Mask
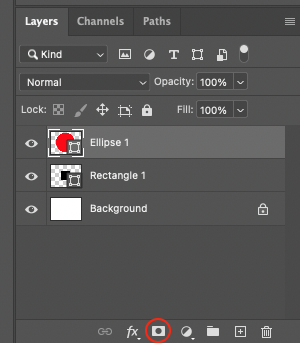
Make sure the layer with the ellipse is selected. This will be the layer we add the layer mask on. To add a Layer Mask, choose the Add Layer Mask icon at the bottom of the Layer’s panel.
After selecting the Add Layer Mask button, you will see a white layer mask thumbnail on the ellipse layer.
Revealing or Concealing
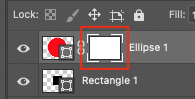
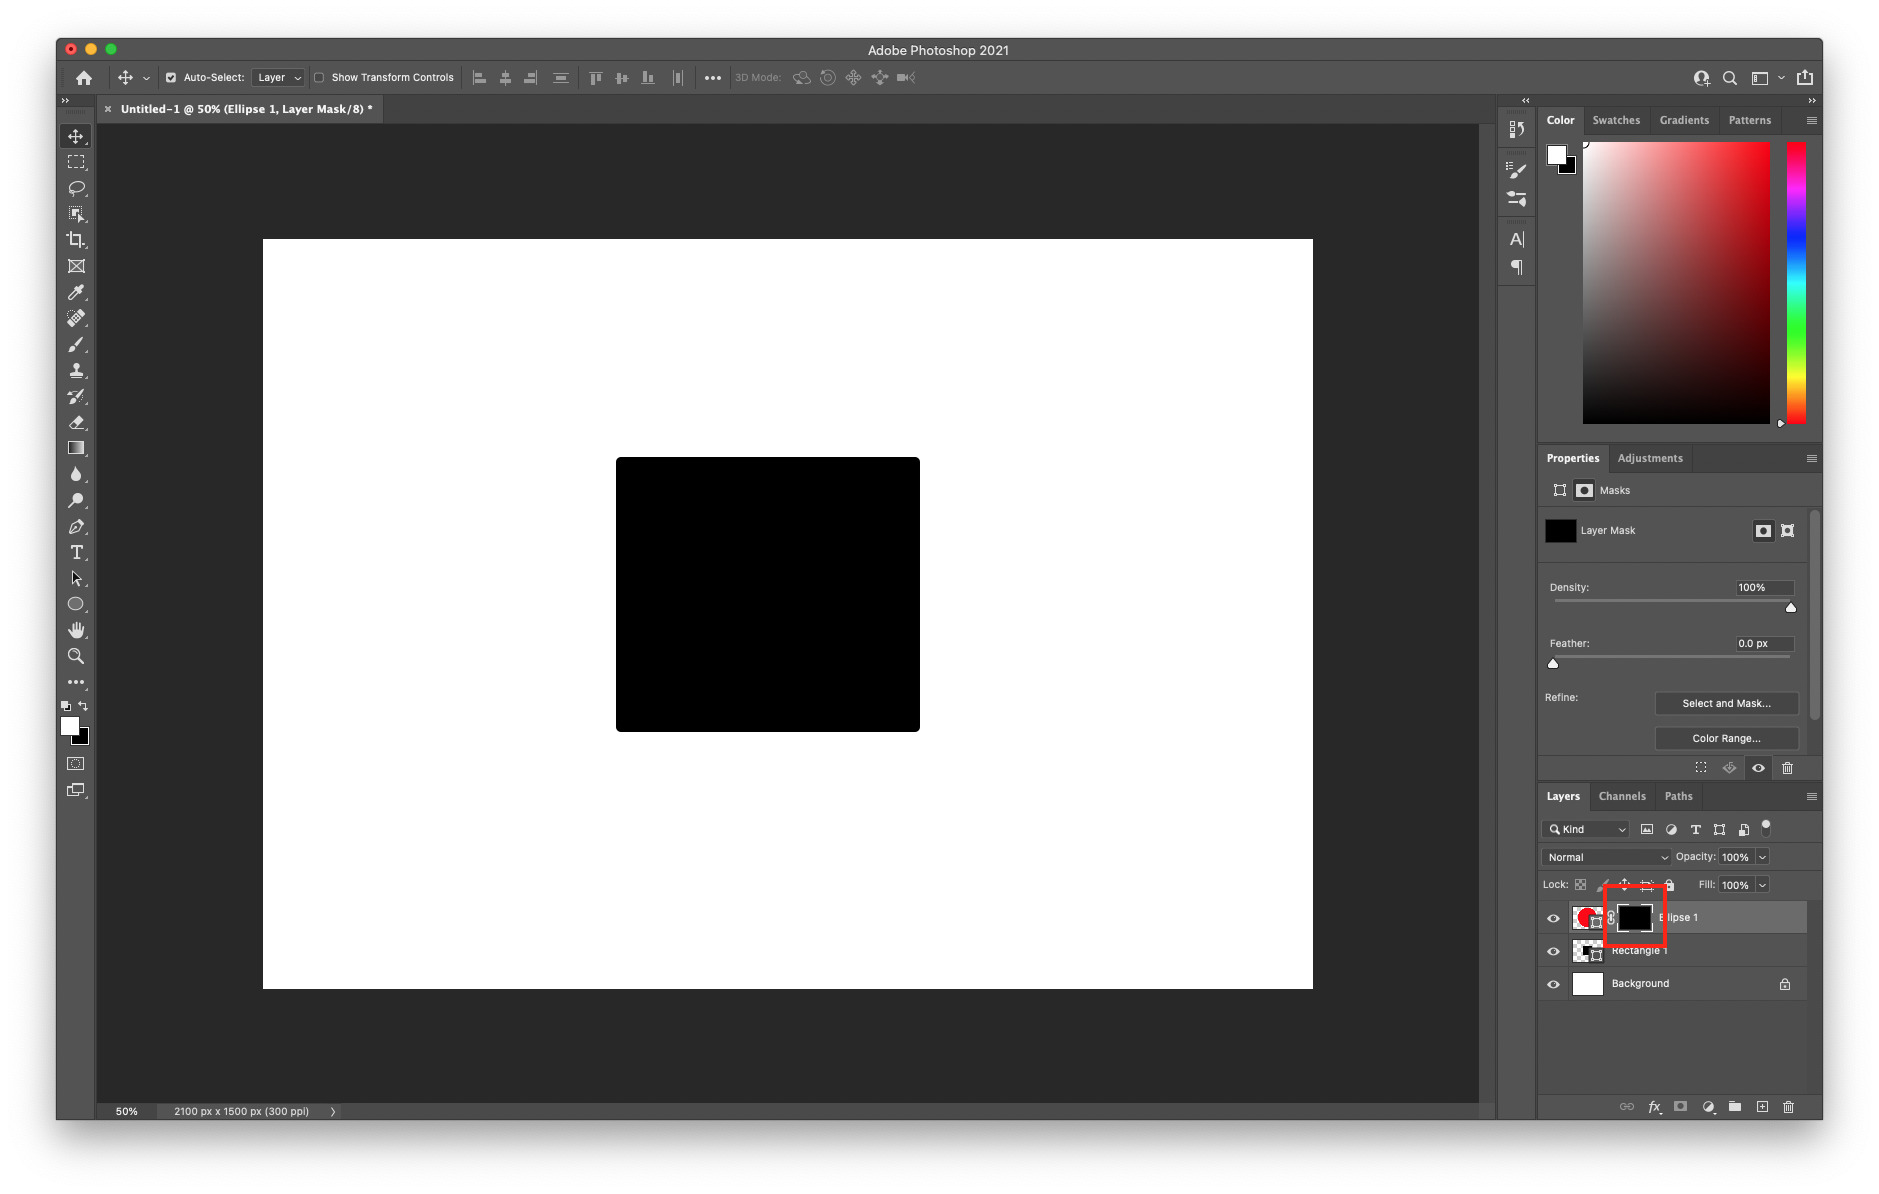
You will notice that with this Layer Mask applied that nothing has changed. That is because the mask is white. Remember that we said ‘White Reveals’? Any white areas of the mask will show the layer. Anything Black will hide the layer. So let’s test this. Because we have just added the layer mask, it will be selected by default. When it is selected, you will see 4 white braces surrounding the layer mask icon. If you do not see this, then go ahead and select the layer mask now. We are going to change the layer mask to all black by inverting it. To do this, press the CMD+I keys on Mac or Control+I on Windows. A couple things have happened (see the screenshot below):- The ellipse is completely gone.
- The Layer Mask is now black -Black Conceals remember? Inverting the layer mask simply swaps the black and white regions of the mask. Since our layer mask was completely white to begin with, inverting it changes the mask to all black.
Now that the Layer Mask has been inverted and set to all black, let’s see what we can do with it.
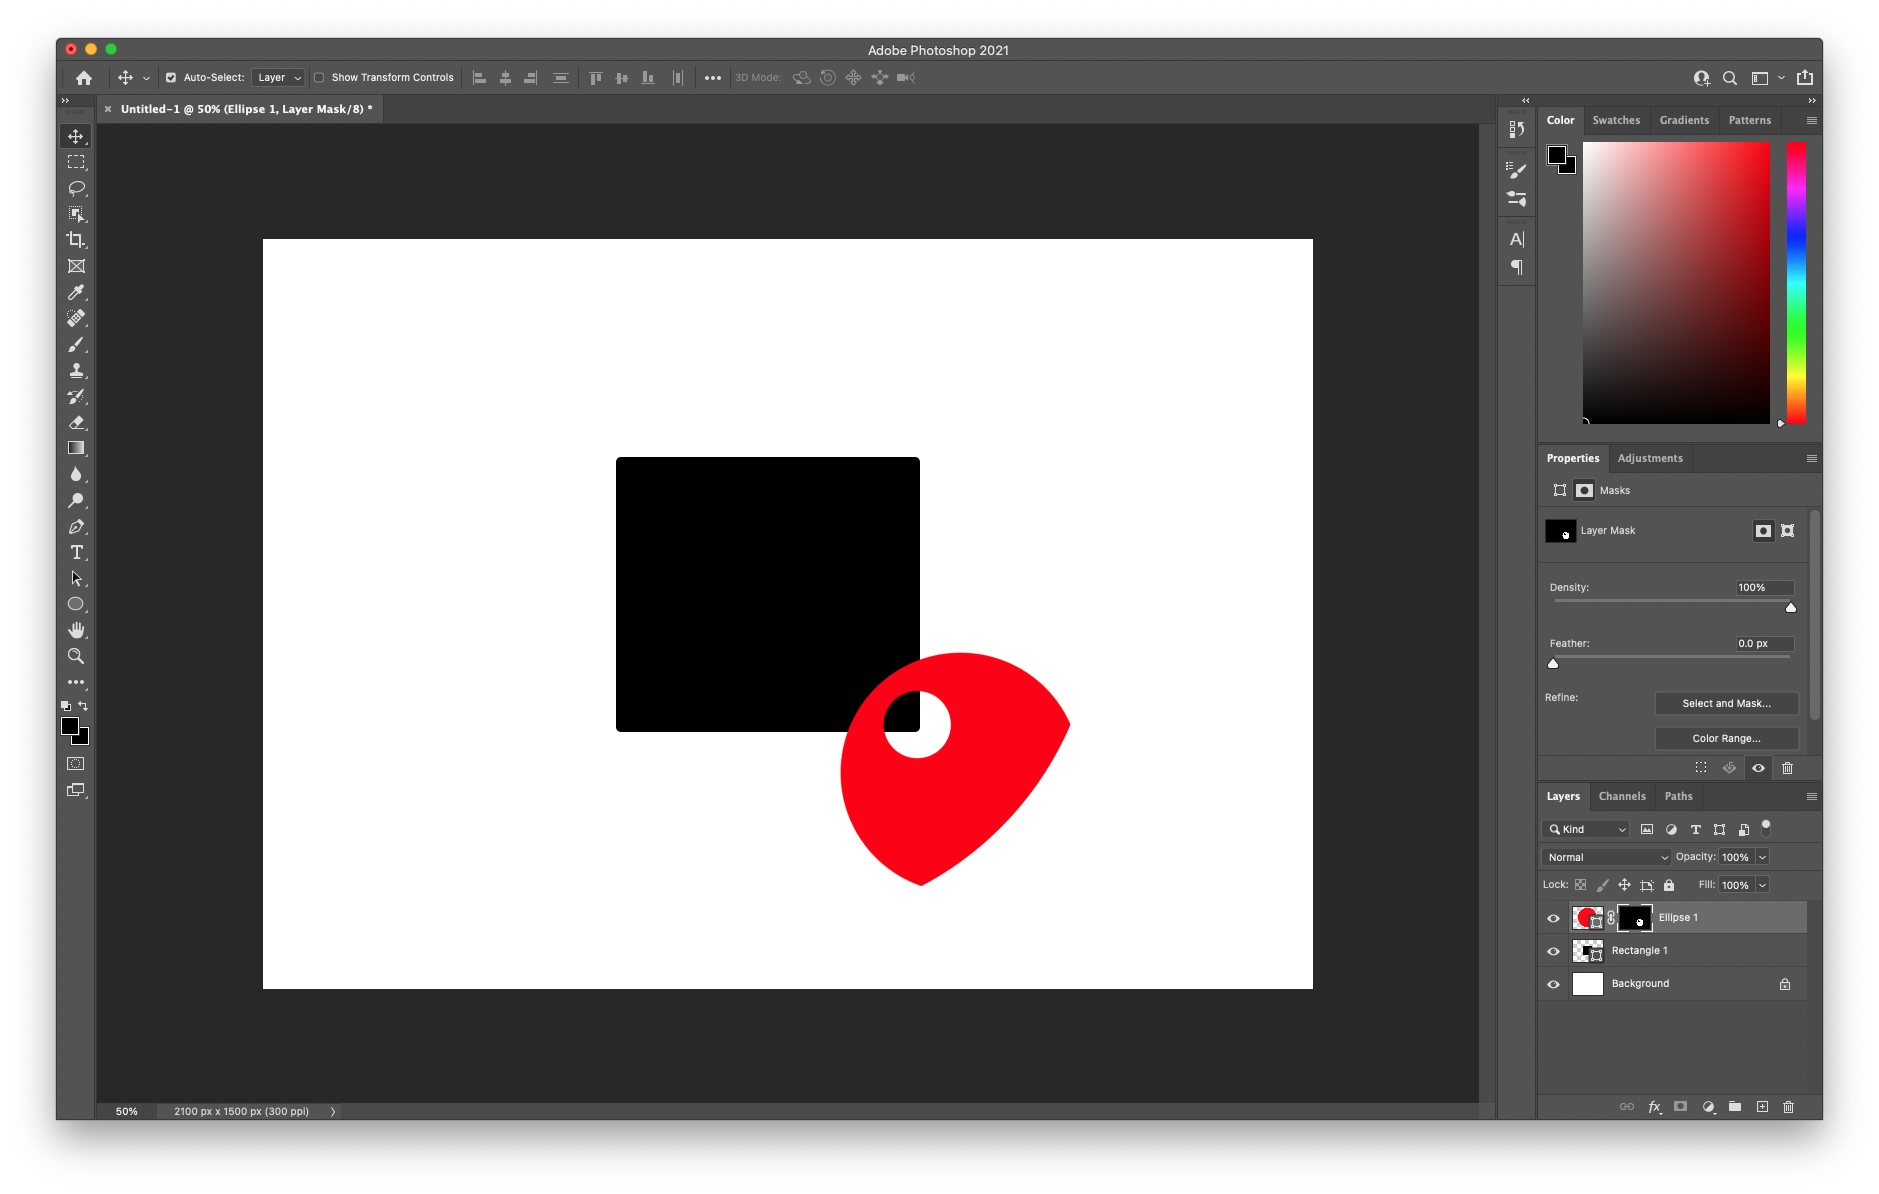
The layer mask should still be selected, but if it isn’t make sure it is. Then Choose the Brush Tool from the Tools Panel. Make sure to set the fill color to white so that we can reveal the layer underneath. I am going to use a solid round brush for this demonstration, but you can use which ever brush you desire. Set your brush anywhere over the rectangle and paint over the top of it just enough to expose the selected ellipse layer. Take note of the Layer Mask thumbnail on the ellipse layer. You will see that where ever you painted white will show here.
This showed you how to reveal/show parts the layer. The same thing can be done to conceal/hide parts of the layer. With the layer mask and brush still selected, change the brush fill color to black. Now paint over some of the white area of the mask. You will notice that you are concealing/hiding that part of the exposed layer. I kept the solid round brush and just reduced its size and painted a small spot on the layer. In the screenshot below, you will see that it concealed/hid the part of the layer that was showing.
As far as the basics go, that’s it. That is how you add a Layer Mask and use it to show or hide parts of a layer. You can expand on this by experimenting with different techniques such as using different brushes, softening your brush and adjusting opacity and flow to blend the layer, cutting out objects, and more. In this tutorial, I only used the Brush Tool with the Layer Masks. It is not the only tool that can be used.
Layer Masks are an extremely valuable tool and something I use in almost every photoshop design. The best part of Layer Masks is that they are non-destructive. If you mess up or want to start over, either delete the mask and re-add it or take your brush and color over the entire mask and just start over. Get out there and practice, experiment, and become comfortable with Layer Masks.
Stay tuned for more advanced Layer Mask tutorials.
Tell us about your thoughtsWrite message
You must be logged in to post a comment.